It was December, and our neighbors asked if we’d like to cruise around and look at holiday lights. Not really knowing what to expect, we went along for the ride. At the first house, we tuned our radio to the listed station and watched the lights. My brain was racing, trying to piece together how it all worked. We were hooked.
My wife and I spent that December (2024) visiting multiple shows, taking notes, seeing what worked, and piecing together our perspective on what was missing from these displays. Then, between Christmas and New Years, we hunched over our computers, downloaded this program called xLights, and started fumbling through our first sequences against our home layout. We were completely hooked and never looked back.
That was the start. We set our eyes on Thanksgiving of the following year, when we wanted to launch our show to friends and family. It was then that the real work began. Below is a month-by-month outline of what we did and the key lessons we learned along the way.
This guide isn’t going to go into all of the details about how to execute each step, but should give you a starting point and gut check throughout the year.
January: Learn xLights (Don’t Touch Hardware)
Here’s the hardest advice to follow: don’t buy a single prop. Don’t even look at pixels, controllers, or any of that stuff yet. I know it’s tempting, you’re excited and want to see something light up, but resist.
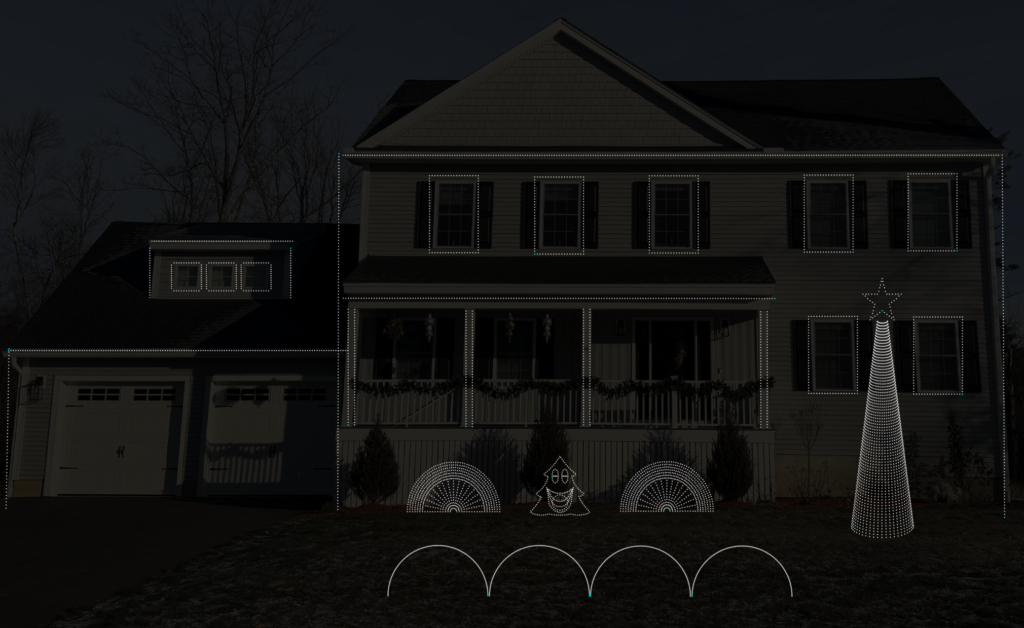
Take a good quality photo of your house and dive into xLights to figure out what you want. This is where you discover the heart and soul of your show. Do you want the classics? A show for kids? In our case, we chose to blend our love of rock music with the hobby to create something that embodied Christmas while not feeling like other shows in the area.
You should be watching a lot of YouTube during this time, finding content creators and shows that resonate with you. Get a feel for what’s possible and what you want to accomplish in your first year.
Here are a couple great YouTube guides you should start with:
- Ron Howard – xTreme Sequences https://www.youtube.com/@xTremeSequences
- David with Learn Christmas Lighting https://www.youtube.com/@LearnChristmasLighting
- Greg Macaree https://www.youtube.com/@gregmacaree
- xLights Gems https://www.youtube.com/@xlightsgems
REALITY CHECK: Out of the 10 sequences we built and mapped to our home during January, we only kept one of them. There was only one that truly aligned with our vision, but by experimenting at this stage, we figured out what we liked and what looked tacky to us.
Don’t pay for any sequences at this stage. It’s not worth it. Check out YouTube videos of good house sequences, but your show is going to change so much that this isn’t the time to invest money in content.
If you aren’t sure where to go for sequences, check out: https://xlightsseq.com/
February: Show Your Friends and Family
You’ve got a couple of sequences built up, this is your time to get perspectives from others to help inform where you want to take your show. What do other people like? Is there something cool about your show that you want to anchor around?
This is where you start landing on a couple of key props in your layout that will help guide your build phase. Start writing out your vision for the show so you can explain it to others. Join Facebook groups at this stage. The community is very supportive and you can learn a lot just by reading previous posts. You’ll quickly start recognizing names of local shows and suppliers. You can search these groups like forums for underlying information, they’re goldmines.
Now you are starting to feel like you can visualize the show. You still don’t own a pixel, and that is OK.
March: Take a Spoonful of Reality
Now it is time to dive into the world of props, controllers, and all the wiring in between.
Do an export from xlights that explains all your props and does a count of your pixels (xLights>Tools>Export Models).
Print a screenshot of your house from xLights to see your props and start to think about how you are going to connect these props. You need to start thinking through “how many controllers do I need?”
CRITICAL TIP – CONTROLLER PORTS: While you CAN run up to 800 pixels off a single port of a controller, that requires power injection. In reality, you can only squeeze about 200-300 pixels out of a port before you need to either power inject or power balance to make your pixels look uniform.
Let’s quickly discuss power: As electricity travels from pixel to pixel, the voltage drops. By the time you’re 200-300 pixels deep, your whites start looking yellow or dim, and colors get inconsistent. Power injection adds electricity partway through the string to compensate.
In your first year, I would recommend that you stay away from power injection or power balancing. There are many places where this hobby can quickly get complicated, this is one to avoid as you learn the basics.
Bottom line: If you have 3,000 pixels, you can’t just use 5 ports on a single controller and call it a day. You’ll need significantly more ports.
This is the time to make your budget. You’ll need to account for:
Your Shopping List (The Real One):
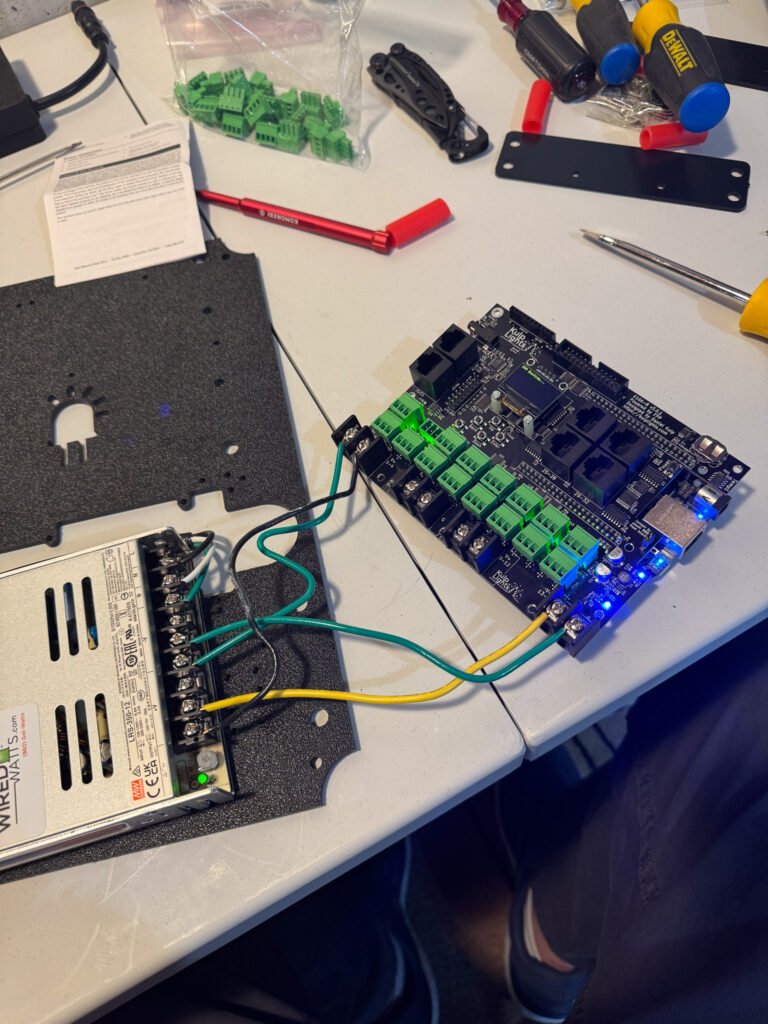
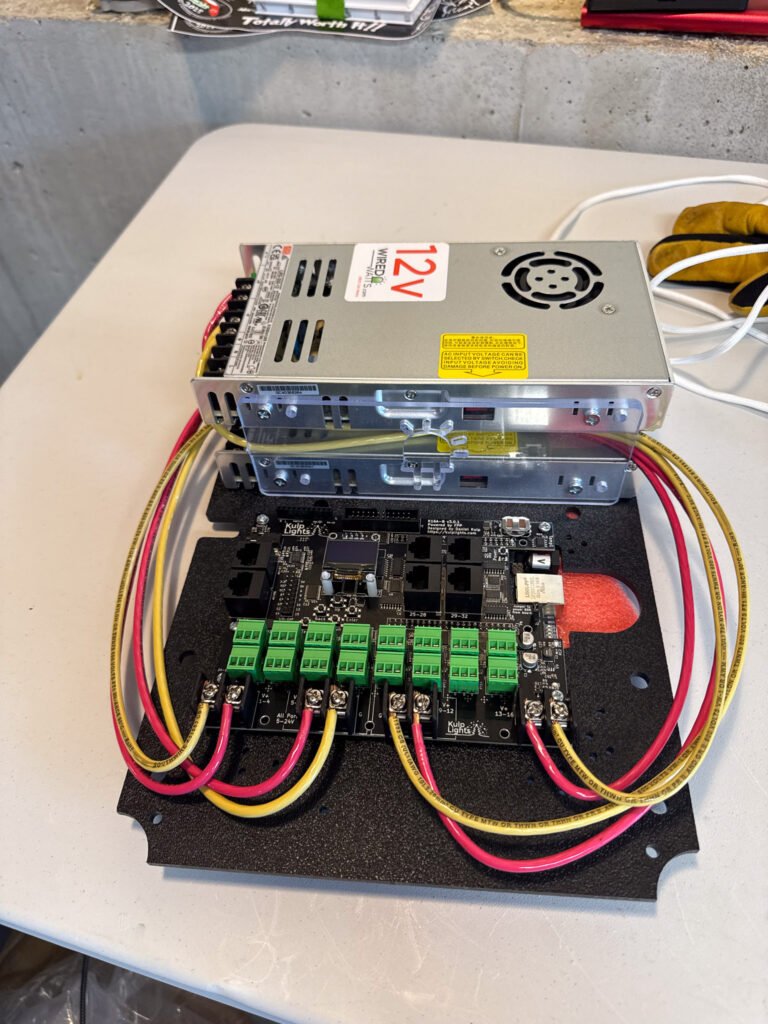
- Controllers (Kulp, Falcon, or Genius are solid choices)
- Controller enclosure boxes
- Power supplies (I recommend 12V)
- Pixel (I recommend xConnect)
- Pigtails (connector cables from controller to strand of pixels)
- Network cables (CAT5e/CAT6 for connecting controllers)
- Extension cords (outdoor-rated)
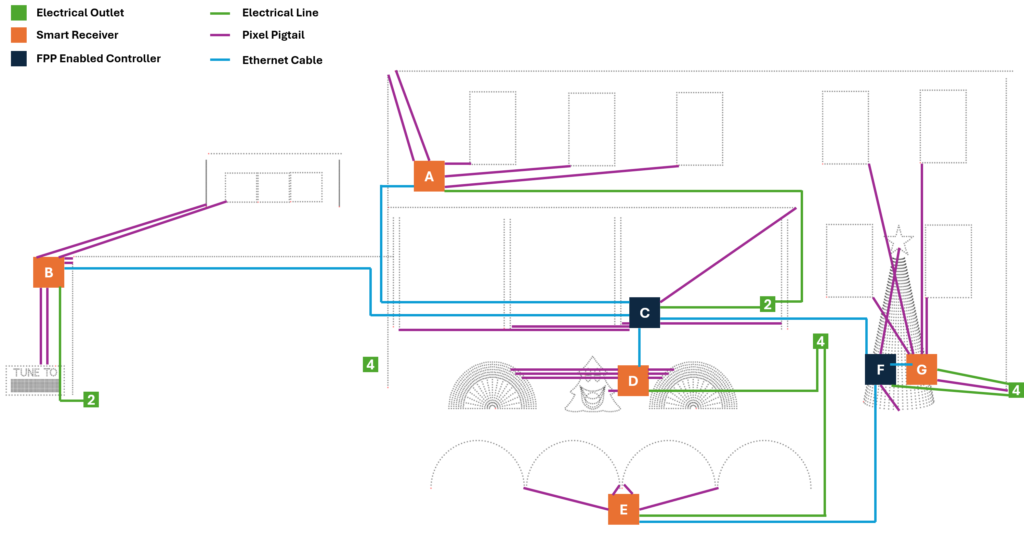
- Smart receivers (for props far from main controllers – Falcon makes great receivers)
- PVC pipe and fittings (for prop construction)
- Mounting clips (SFL Designs https://sfl-designs.com/ and 3D printed options)
- Zip ties (buy way more than you think you need – in our first year we used approximately 1,000)
- Testing equipment (multimeter at minimum)
- Spare pixels (at least 200 extra)
- Pixel repair tools (I recommend Clickets – Clickets are waterproof quick-splice connectors that make field repairs easy, you strip your wire, insert both ends, and click them together. They’re lifesavers for quick fixes in the cold.)
- FM transmitter and antenna components (Best guide is: https://mrcreedslights.com/dipole-antenna/)
- Label maker
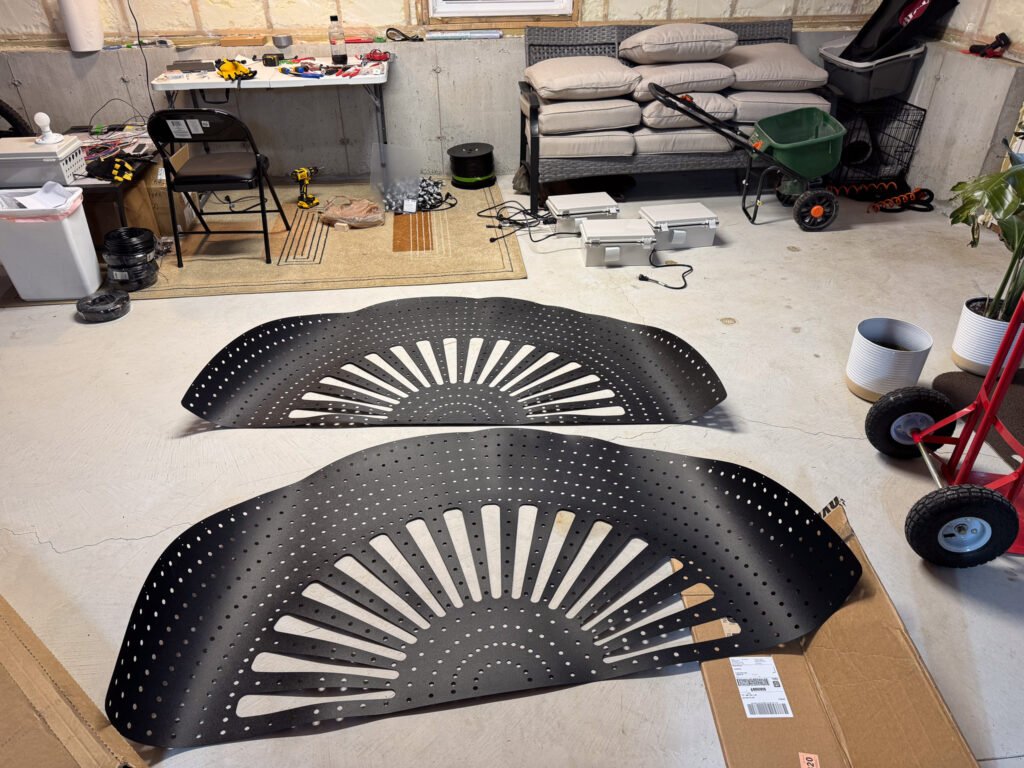
- Props (arches, trees, window, snowflakes, etc.)
- Raspberry Pi or similar for FPP (May be included in your controller)
I most underestimated the number of controllers and smart receivers I’d need, as well as total pixel count. Just because you need 3,000 pixels doesn’t mean buying exactly 3,000 is enough. You’ll cut lines, make mistakes, and want to avoid excessive splicing, especially in year one, as those splice points become potential failure points during showtime.
Also, look at the practicality of your home’s electrical system. How much electricity do you have available through external outlets? I ended up adding 12 external outlets to my home, spread across 6 separate 20-amp breakers (yes, overkill) so I had confidence I could run any setup I wanted with room for growth.
Couple great suppliers to check out to get started:
- https://www.wiredwatts.com/
- https://boscoyostudio.com/
- https://gilbertengineeringusa.com/
- https://www.holidaycoro.com
- https://kulplights.com/shop/
- https://pixelcontroller.com/store/
This won’t be a full budget breakdown, but I would roughly estimate $1.25-$1.75 per pixel installed on your home for the first year. This includes the cost of learning. Longer term, you can likely get down to about $0.80 as a safe estimate.
April: Order Everything on Your List
I placed orders with all the big suppliers at this point because most items were just coming back in stock, and this gives you maximum time to experiment with the tech and start pushing pixels. Nights and weekends will quickly be consumed by this hobby, and you won’t even know where to begin.
LESSON LEARNED: I ordered in April and didn’t receive everything until August because some items were backordered. I didn’t want to reach November still waiting on parts because I was worried everything would sell out or supply chain issues would prevent me from getting controllers or other critical components.
Once orders start arriving, pick a prop you’re excited about and wire it up. Build a controller box with FPP and get a test running. Nothing is more exciting than seeing your first pixel light up, it’s validation that this is actually working.
Controller Recommendation: I went with Kulp controllers with WiFi adapters and found they offer excellent WiFi strength. Falcon and Genius controllers are also highly regarded in the community, you can’t go wrong with any of these brands.
You’ll struggle with FPP at this stage and figuring out how to connect to it via xLights. You may need a USB to Ethernet adapter since most computers don’t have dedicated Ethernet ports anymore. Start with the controller hardwired to your computer to eliminate WiFi variables during initial testing.
Don’t worry about sound at this stage. That comes much later.
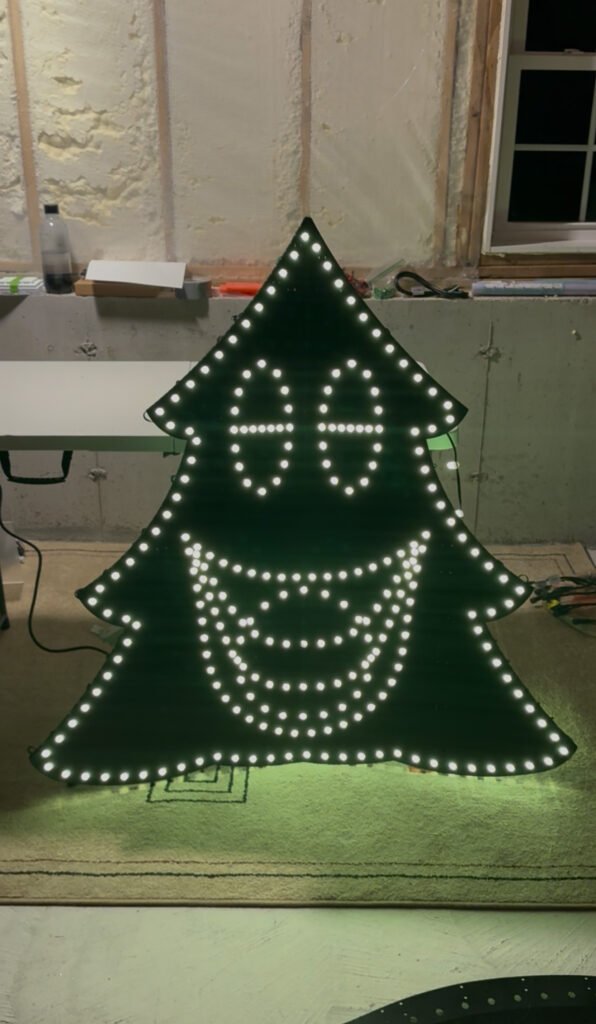
May: Sequence to a Prop
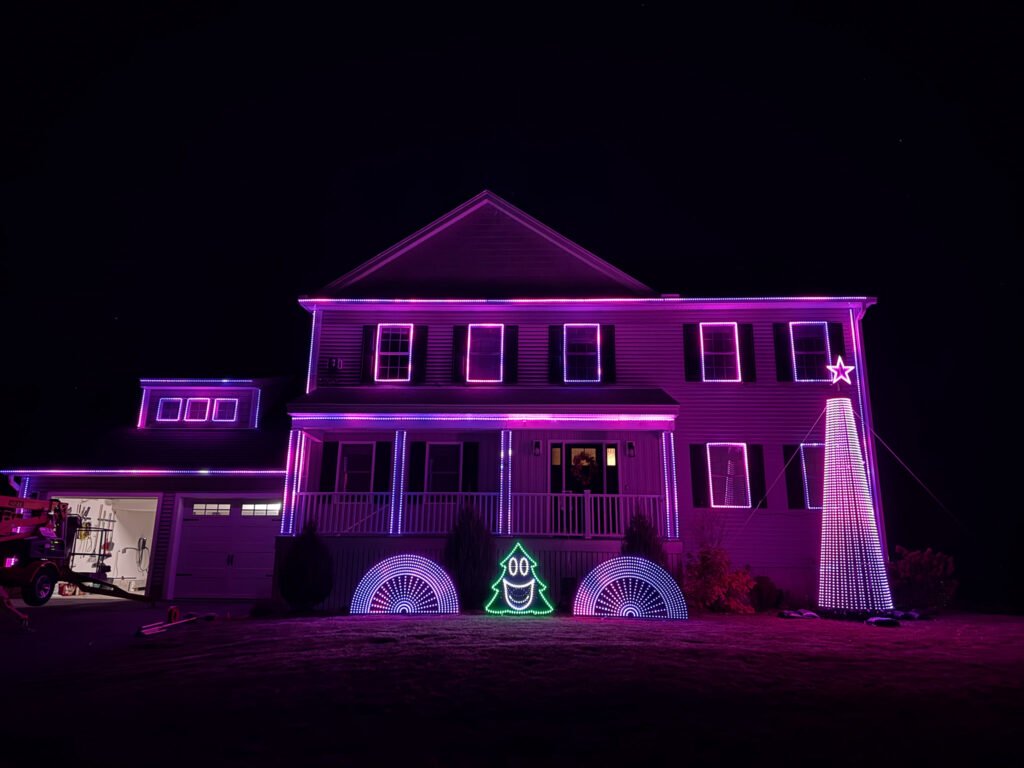
For me, this was getting my singing Christmas tree to actually sing to a song. It was magical. I had cables all over the ground, had run some tests before, but never pushed an actual sequence. When it all worked and the tree started mouthing the words, I practically danced around my office. I sent videos to all my friends and family, who were both amazed and rolling their eyes at my obsession.
Celebrate this moment. Then get back to pushing pixels.
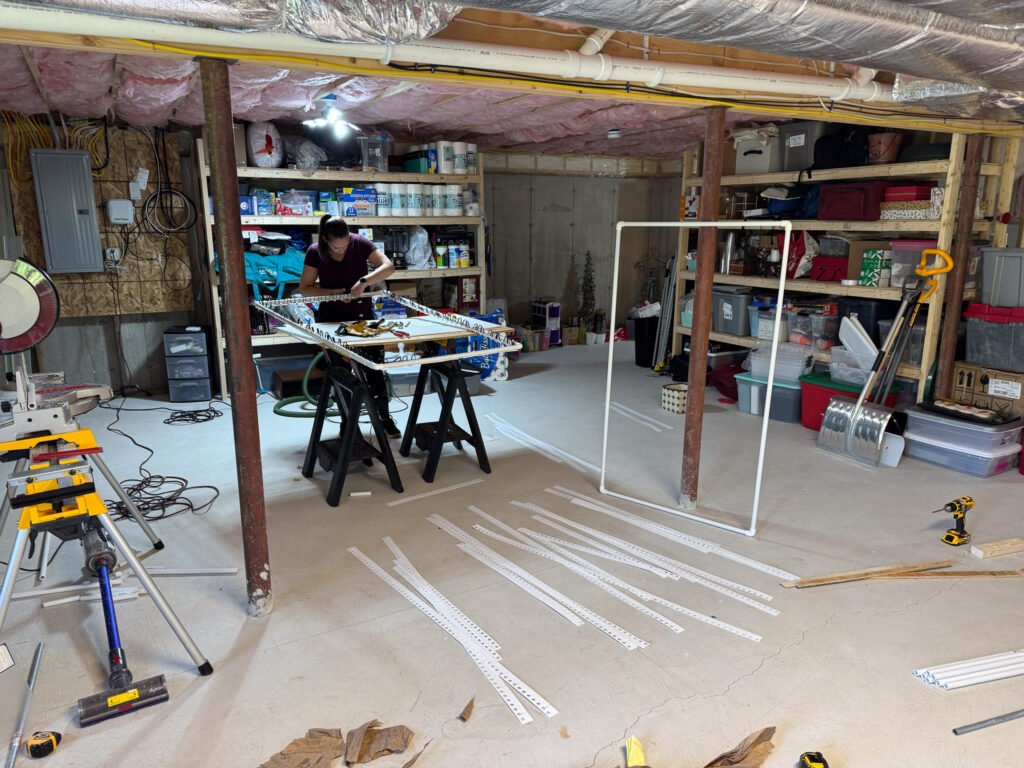
June: Pixels All Day Every Day
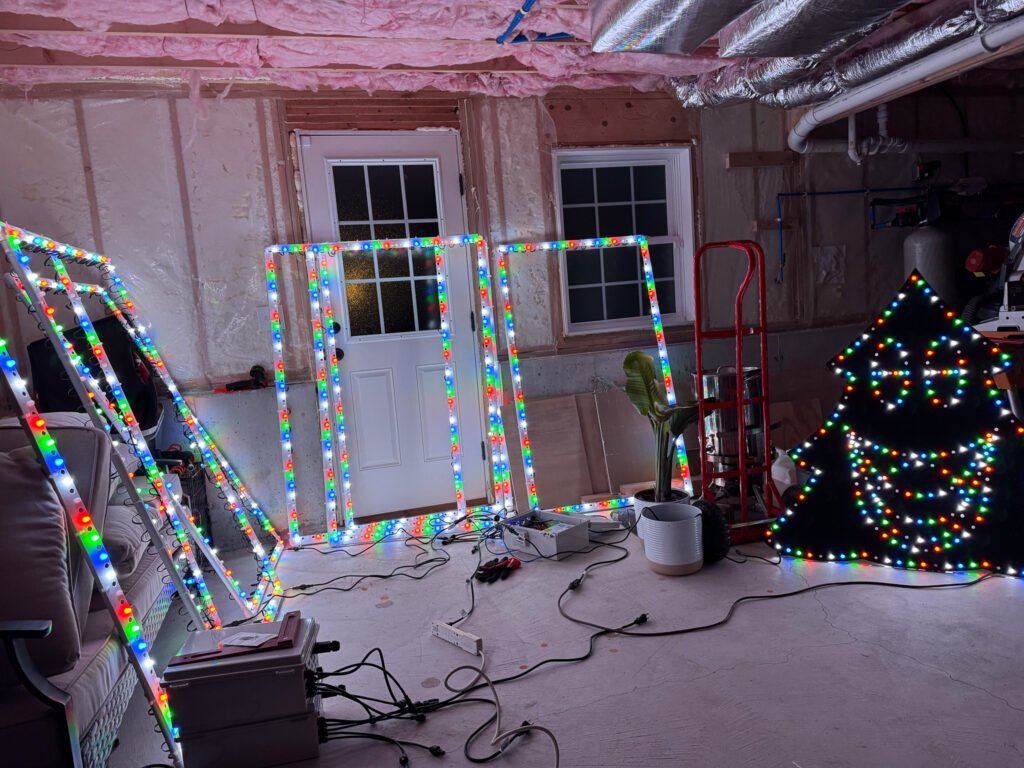
This was when I really hunkered down on pixels and building props. In my first year I had over 6,000 pixels, all pushed by hand. Sometimes we had to push them multiple times when we misread wiring diagrams. I cannot emphasize how easy it is to mess up wiring some of these bigger props. Really take your time, and having someone help you as “quality control” is actually really important.
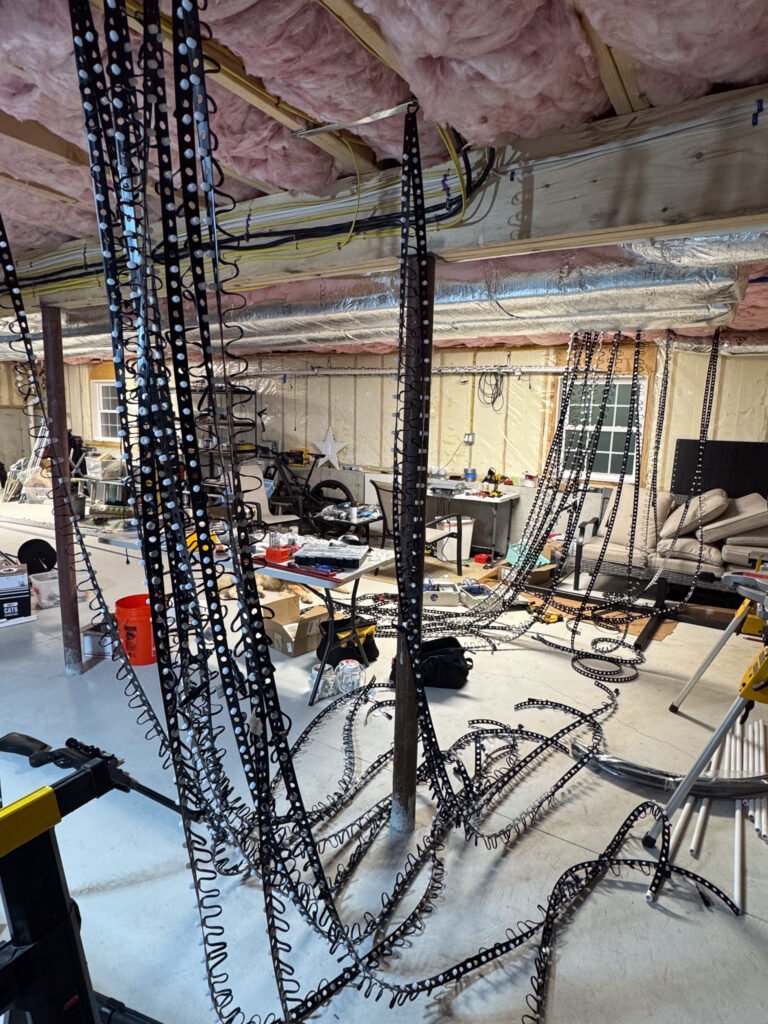
PRO TIP: Label everything now. If you have a prop broken into three lines of 200 pixels each (to avoid power balancing), label which port is first, second, and third. This is incredibly helpful when you’re trying to wire everything up months later in your front yard in the rain, snow, sleet, blistering cold wind.
Take time to string three props together with FPP and have all three work simultaneously. You already got the singing tree working, now bring two others online. This is where you start seeing the show take shape.
Spend only a little time in xLights during this phase. Continue updating your house model via the layout tab to ensure you have accurate pixel counts. Trust me, this makes sequencing dramatically easier later. Write down everything. Continue to go back to the printout of your house. By now you will have scribbled down house measurements, pixel counts, etc.
July: Socials and Mounting
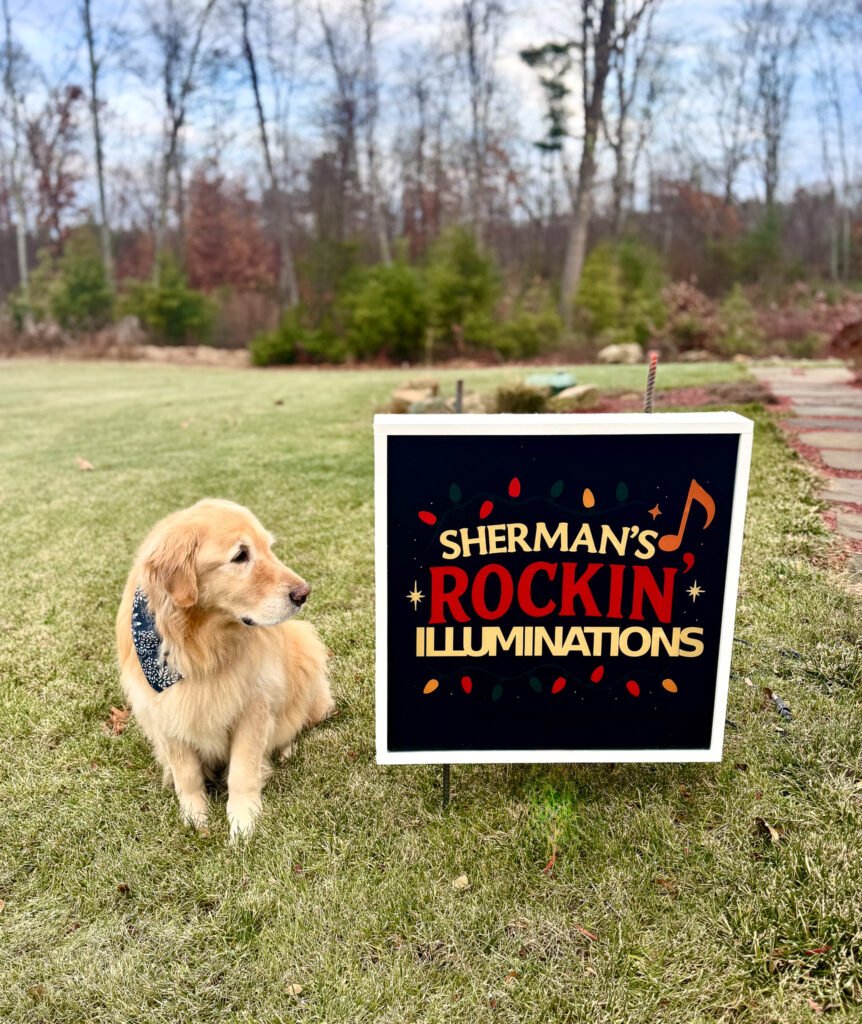
Come up for air from pixel world. What are you going to call your show? Have you thought about what lists you want to be on and how you’ll get people to actually attend? This is the time to tackle these items.
Pick a name, register the domain, and set up your Facebook and Instagram pages. Your show is taking shape. This is when I started my countdown and made a solid plan between that date and when I wanted pixels on my house. The countdown is officially on.
FM Transmitter Time: I recommend building a dipole antenna (easier than it sounds). I used this guide from Mr. Creed’s Lights and it turned out awesome. Start looking at shows around you to understand what frequencies others are using. You’ll need to retest closer to your show to ensure there isn’t another transmission on your intended channel.
PRO TIP: Use the dynamic tune-to sign with scrolling text. If you need to change your radio station, you can update it in software rather than rearranging physical pixels.
You also need to start figuring out how all your props will mount to your house. I ordered a random collection of clips and connectors to test different approaches, window mounts, siding mounts, etc. If you have a 3d printer, this is going to be a game changer. This gave me a clear idea of what I liked and what I wanted to avoid. My main goal was nothing permanent on my house and everything as clean as possible. I accomplished this for the most part using SFL Designs clips heavily, and I’m really proud of the result.
August: Pixels Are Pushed, But What About Your Sequences?
Somewhere in August you should see all your pixels pushed into props, and your life becomes pixels everywhere. Your friends think it’s all you can talk about. You dream about pixels. Time to dust off xLights and spend quality time in front of your computer again.
I started a Word document with a list of songs I knew I wanted, plus a list of links to sequences I thought were cool. As I surfed the web, I’d drop links into this doc, it became my running list of potential options. The show was taking shape.
I recommend targeting 50% of your sequences mostly done at this point. They look good when they are rendered, you are working through all of the wiring nuances and setups within xLights. You’re feeling like a pro by now.
FIRST YEAR ADVICE: I suggest you don’t do custom sequences your first year. There are plenty of free and paid sequences out there that can make your show look great without the added hassle of coordinating with a sequencer. Also, you’re still changing your layout at this stage, maybe not big picture stuff, but you’re discovering sub-models in xLights and adjusting pixel counts in windows, around doors, etc. Your layout isn’t really stable yet.
Honestly, my layout continued getting tweaked until the week after I had pixels on my house because I noticed errors once everything was live.
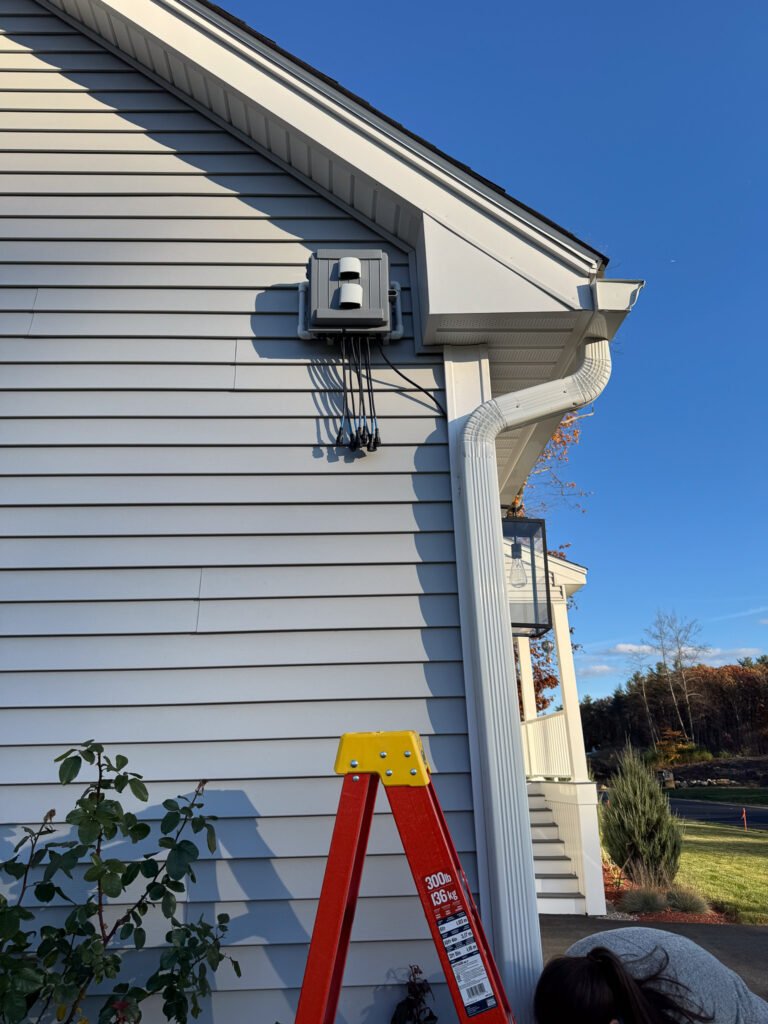
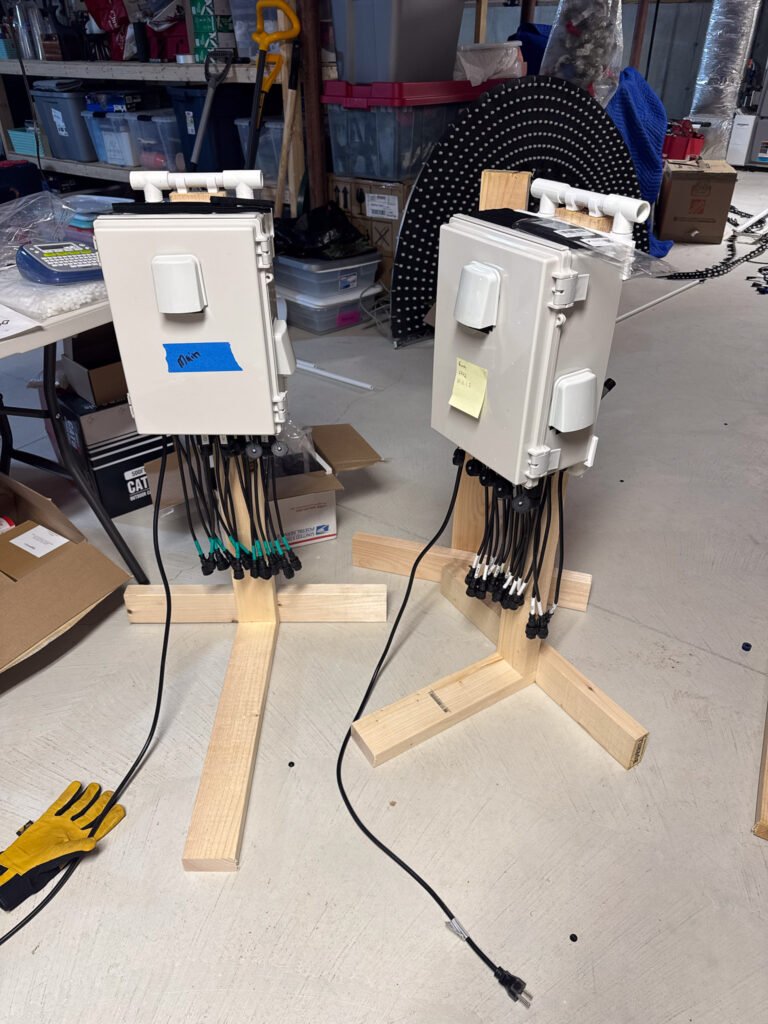
You should have all your controllers built by this stage in a consistent format. Stick with one brand for your main controllers and one type of smart receiver. You can mix and match brands, but consistency gives you more options to swap things out if something breaks when you launch your show.
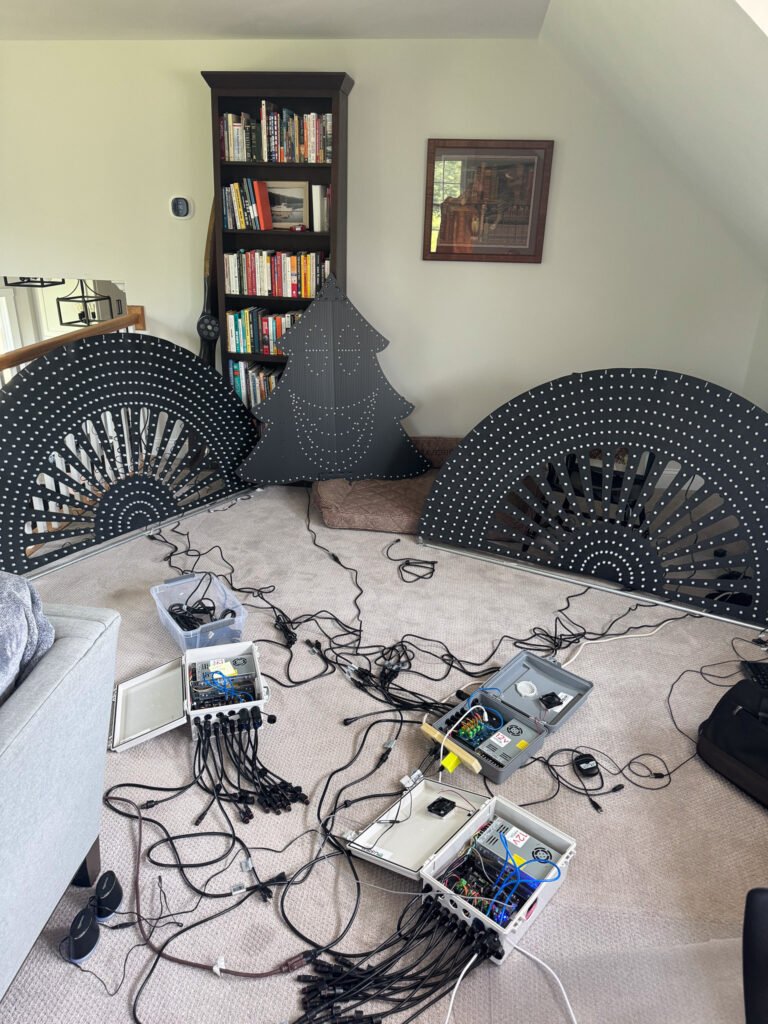
September: Dry Run
Hook up as many controllers and props as you can in your basement, garage, living room and push a sequence. You will learn so much at this moment it’s hard to describe. Things will go in a million different directions. Divide and conquer. Pick one problem at a time and troubleshoot. You’re in the thick of it.
As you fix issues, you’ll update xLights. All your props should be done, you should be focusing on how your entire show comes together. This is where you’re networking controller boxes together and ensuring props work as expected when running off smart receivers rather than your main controllers.
UNDERSTANDING SMART RECEIVERS vs. FPP CONTROLLERS: Your main controller runs FPP (Falcon Player) as either the master or a remote, it’s the brain that interprets your sequences and sends data to pixels. Smart receivers are simpler devices that don’t run FPP; they just receive data from your FPP controller and pass it to pixels. Think of your FPP controller as the conductor of an orchestra, and smart receivers as section leaders who relay the conductor’s instructions to specific instrument groups. Smart receivers are perfect for props far from your main controllers, they’re cheaper, smaller, and you can place them exactly where you need them without running excessive data cables back to your main controller.
Did I mention you need to label everything? I labeled all my boxes with letters so I could easily refer to them in diagrams and in my head when wiring things together. Do version control on your wiring diagrams. You’ll iterate, and if you have a helper, you want everyone working from the same source.
Use this as an opportunity to burn in your pixels. Let the show run for a day in your garage, then check all your pixels. Don’t just check that they turn on, run a chase sequence so you can see all pixels display all colors. Pixels fail in all sorts of ways. Sometimes it won’t turn red, sometimes it won’t turn on. I found that when my show was installed on my house, my issues changed from pixels to network problems. My first thing to check now is the network cable.
October: Polish
You’re so close. You’ve learned a ton and are probably laughing at some of the things you thought you knew when you started, having only come to realize there was so much you didn’t even know you didn’t know.
I spent most of this stage working on sequences and my show flow. I was meticulous. This gave me the chance to watch my show come together and understand where I needed to focus energy. I debated play order. I was watching a lot of shows online, taking it all in.
This is also when you take inventory of spare parts. My recommendation:
- At least 200 spare pixels
- Clickets or similar splice connectors
- Extra controllers and smart receivers
- Spare power supplies
- Extension lines and data cables
- Stock up on mounting clips, target 20% more than you need because they will break in the cold
November: It’s Showtime
We sent invitations in September to friends and family for a lighting party the week before our show was expected to go live. This gave us a hard deadline of the weekend before Thanksgiving, which meant I needed pixels installed on the house at least a week before that party for adequate troubleshooting time.
GAME CHANGER: I don’t like ladders. I rented a cherry picker for the day, and it was absolutely worth it. Trying to put lines of lights on my gutters 30 feet up, in the wind, was made significantly easier because I could move and work on props without the fear of falling off a ladder. Yes, you have to be careful on a cherry picker too, but for me it was a much more stable platform.
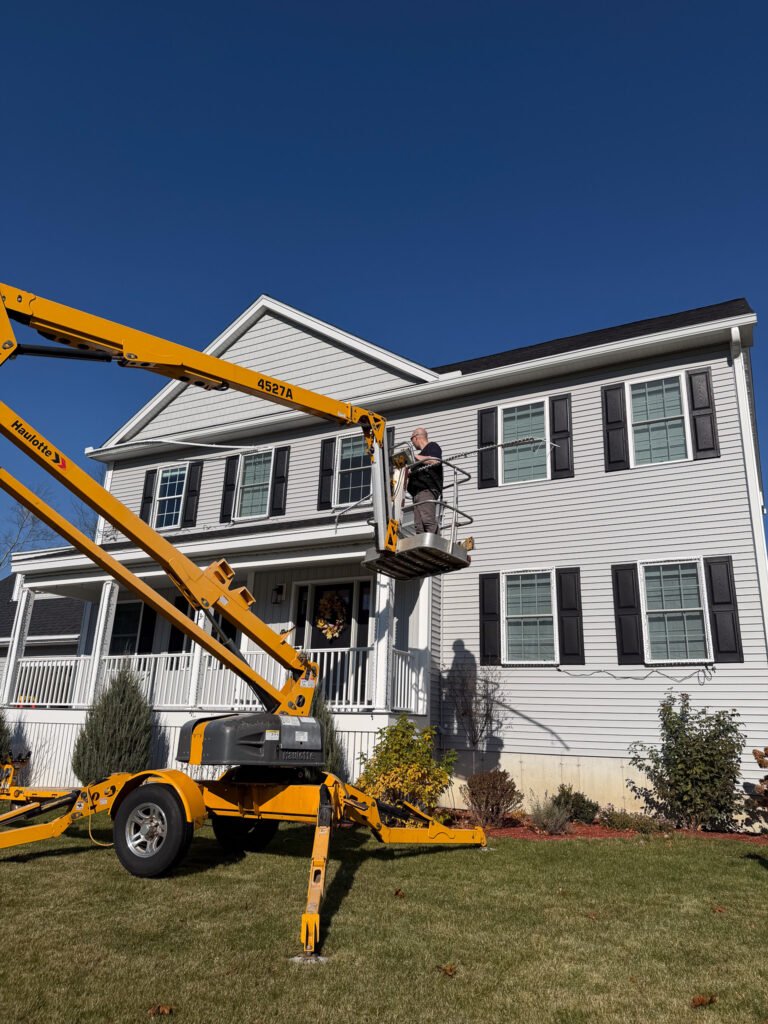
It took us a full 12 hours to get all props up and wired together. We were fortunate to have a warm November day outside of Boston, but we were mentally prepared to do it in the snow if needed.
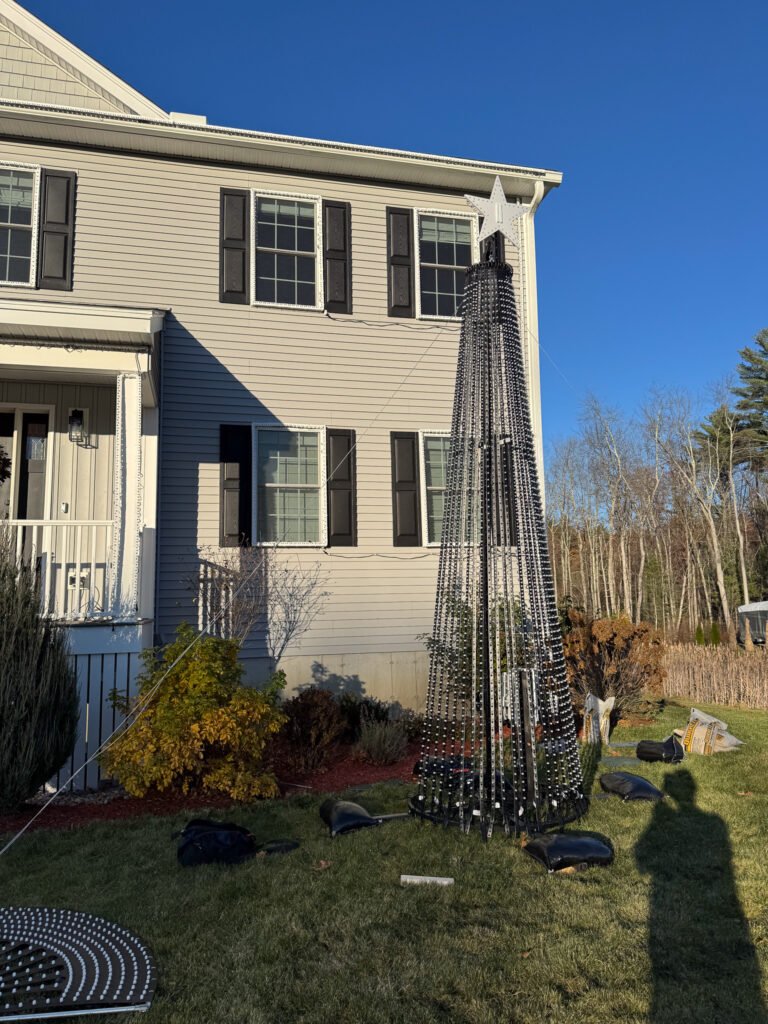
Once we got everything running, we put on a test sequence and immediately noticed one strand had pixels that wouldn’t turn blue. We ended up cutting those pixels out and installing new ones (note that pixels are directional in their data flow, data flows in one direction only). We used Clickets for that installation, which I personally love because they’re easy.
This is a time for testing and more testing. Bring someone who’s never seen the show and have them ask questions about why things dance the way they do. Watch pixels around the edges. Do all pixels in a row light up correctly? Do chases work properly? Is the sequence behaving how you expected?
We had a couple of issues at this stage and realized most were related to bad data connections.
December: Enjoy the Fruits of Your Labor
Hopefully your December should be relatively stress-free. In the first year, it’s unlikely you’ll have major failures if you did sufficient testing up front. Things will go wrong, you’ll learn, but overall it should be enjoyable.
We had a couple of pixels fail in our show, nothing major, and all were quick fixes. Having spare parts on hand makes it a lot easier.
Make sure you are looking ahead to January. I already have the cherry picker reserved for the day I will take my show down.
You made it. Feel accomplished and proud of what you built. You’ve learned a lot about a niche hobby that most people don’t know where to start, and you’ve probably made a bunch of friends along the way.
The Bottom Line: This hobby is absolutely worth it, but it’s not a casual weekend project. It’s a year-long commitment that will consume your nights and weekends. The technical challenges are real, the budget adds up faster than you expect, and you’ll question your sanity more than once. But when you see those lights dance to music for the first time, when you watch kids and families pull up to experience your show, it all clicks. Welcome to the community, we’re glad you’re here.